
4-11-14 1:38pm 
Puzzled by how to save your Verizon voicemails? Feel trapped on their network because you don’t want to lose the precious, special, or important sounds in their system? I was and did. I even tried saving them through the Verizon system but it left me with a file only that phone could read. Some people think it’s stupid that I save voicemails but it’s really important to me to be able to hear the sound of my loved ones’ voices. It soothes me, especially when I can’t be around them or if/when they die. Google Voice solves the problem.
What you’ll need:
- Active Verizon voicemail account
- Google Voice account
- Phone #1 – phone that does not have a Google Voice account linked to it OR phone whose Google Voice number is not the same as the number whose voicemails you’re recording.
- Phone #2 – a second phone that your Google Voice number rings to (cannot have the same number as the phone number whose voicemails you’re retrieving.)
- time
- patience
Directions:
- Go to Google Voice www.google.com/voice
- Log in if prompted.
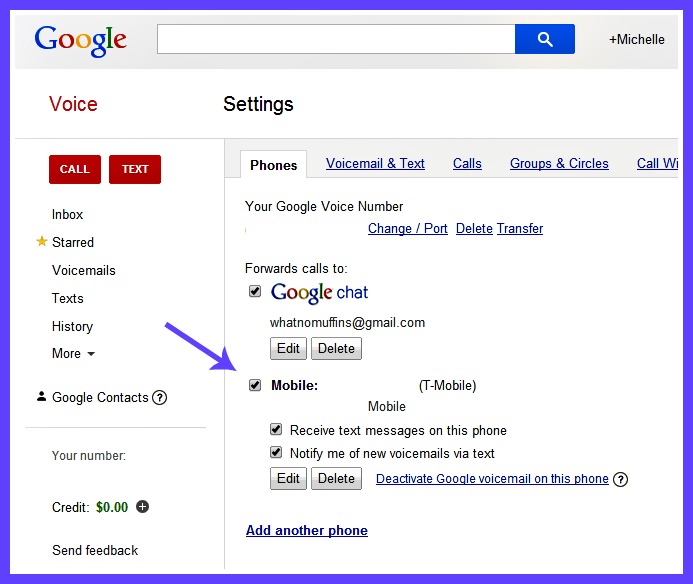
- Click on the gear icon in the upper right.

- Choose “Settings.”

- Uncheck all phones but Phone #2. Note – Settings is also where you can choose a different number for your Google Voice number to ring to.
**Remember to put the settings back when you’re finished recording!
- Click on the “Calls” tab and check the “Enable Recording” box.

- From Phone #1, call the Google Voice number that rings to Phone #2.
- If prompted when answering, press 1 to accept the call on Phone #2.
- Don’t hang up.
- Call your Verizon number from the keypad on Phone #2.
- Press # during your voicemail greeting and enter your Verizon voicemail password when prompted.
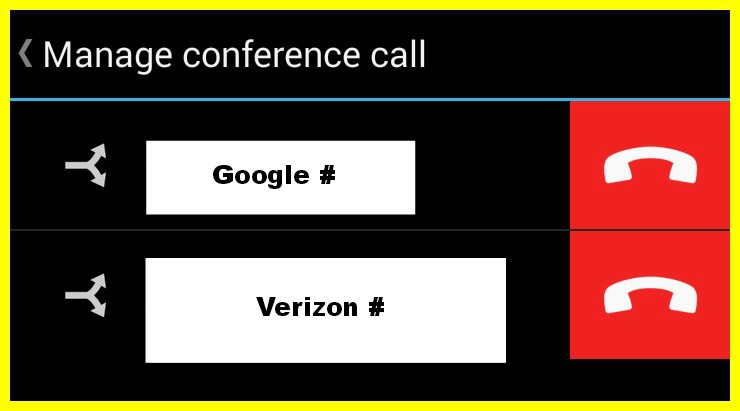
- Merge the two calls (making it a 3-way).

- Mute the mic on both phones to ensure only your voicemail is recorded.

- Press 4 on the Google # line to start call recording.
**Make sure you hear the recording announcement.** - Listen to the first message.
- During the message, press the keypad to minimize the numbers & then “manage conference.”

- Listen to the message.
- When the message is over, quickly press to control the Verizon #’s keypad, enter command (save/skip/etc.).

- Merge calls again before next message starts.
- Repeat steps 16-19 until all desired messages have been recorded.
Note – It may take a few tries to get the timing down. I recommend trying this with one test message before recording all of them. - When you are finished recording, press to control the Google #’s keypad from the calling phone.
- Press 4 to stop recording.
- Make sure you hear the end-recording announcement.
- Hang up both lines.
- Check your Google Voice account to make sure the recording showed up. It will appear as a very long new voicemail.


Congratulations! You can now download an mp3 of your voicemails or listen from your inbox. You are free to move about the globe contract free!
I really hope this helps. It took me SUCH a long time to figure out and I’m still not sure how exactly I did it. I just know I finally did. Let me know if it works for you. I know it gives me peace of mind that my memories are safe as I switch to T-Mobile.
© Michelle Routhieaux 2014

